Table as a service: integration designing with D365F&O -- a walkthrough
What is TAAS
Table as a service is a very convenient way of high
frequency, high volume data exchange, operations, without the need of worrying
about the supporting architecture, speed and efficiency. I can make my data be
stored and arranged as per any need, without sticking to a fixed metadata,
beforehand – as compared to conventional DBMS definition. Your Table exists as
an API, whereby you can call the API and enforcing PUT, POST and delete actions
thereby.

Table as a service as a storage
Azure table storage exists as a patterned NoSql data in
Azure, resulting in a schema-less design.
Table storage generally comprises of following components:
Accounts: a subscription account that connects all the storage
offerings(Blobs/files, queues, containers, tables)
Tables: a table can comprise of several entities
Entities: an entity is like a row that comprises of several
properties
Properties: Key-value pair
Look at the following example, that comes from a TAAS on a
successful creation:
<content
type = “application/xml”>
<m:properties>
<d:PartitionKey>RecId</d:PartitionKey>
<d:RowKey>2121212313</d:RowKey>
<d:TimeStamp
m:Type=”Edm.DateTime”>2019-12-22T06:06:06.673110727</d:TimeStamp>
<d:AcqMethod>Test3</d:acqMethod>
<d:Description>Test
desc</d:Description>
<m:properties>
</content>
The above example results from an attempt to write into a
table, with fields AcqMethod and Description. PartitionKey and RowKey are
evidently unqiue key pair. Here the record exists as a property (starting from
<d:PartitionKey> to <d:Description>). The table does not have any
fixed schema as contrary to our concept of RDBMS.
Creating a table storage
Step 1:
Navigate to ~\Home\All services\Storage accounts\admin
storage account. Choose from ‘Tables’.
Step 2:
Create a new table à
give a table name(avoid using ‘_’ or special characters). Press OK to to
continue.
This would result in creating your table. See the adjoining
URL, implying that it exists as an endpoint API.

Step3:
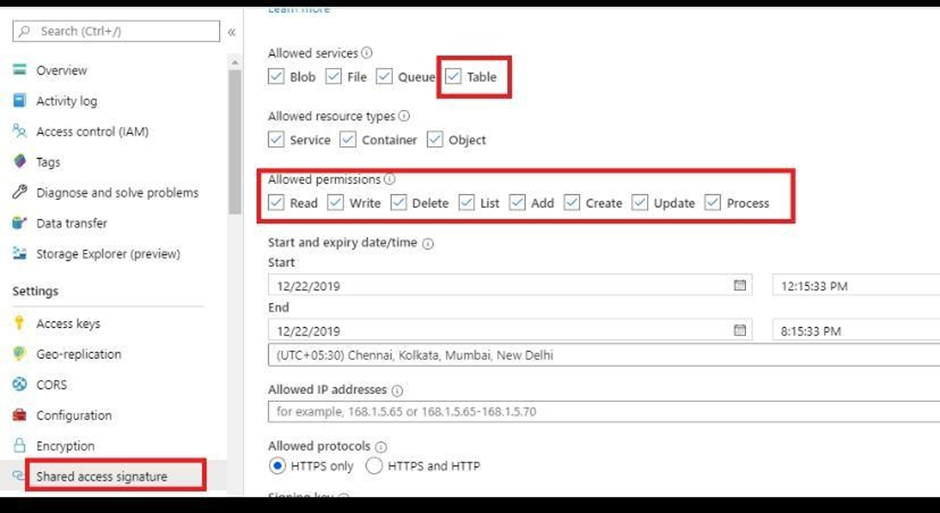
Shared access signature (SAS):
A shared access signature is an easy way common palette of
data access for various modes of data storages: Blob, Queues, tables or
containers.
Navigate to left hand pane à
Shared access signature à
Generate SAS and Connection string button. Tick on ‘Table’ à to create Keys for
Table. Also click on the necessary allowed permissions:
This will generate the following access key/connection
strings:

Querying your table from Postman:
Copy the ‘Table service SAS URL’ à Open postman à paste it in the
browser à
amend to include the table name you have created between ? and the last ‘\’ à do a ‘GET’ à Send
It will result in the records of the table as an XML’s key
value pair dataset:

Note: how the name of the table has been given at the end of
the SAS key.
Viewing from Azure browser
You can download Azure browser from:
https://go.microsoft.com/fwlink/?LinkId=708343&clcid=0x4009
You can install the storage explorer. It’s an ultimate tool
to upload, download, maintain and query your storage contents – just like the
older days of SSMS.
Browse down to à
on the left hand pane Subscription name à
Storage accounts à
created table:

You can query quite easily using query button from above:

Using logic apps: integration
Logic apps could be used successfully as a messenger
exposing your Table Services to expose, interpret/Parse and consume data. You
can expose your table as a service and then write a trigger to be fired when
the data comes to your table as a HTTP request.
Steps:
a.
Figure out an HTTP request with the following
JSON payload as its sample payload:
{
“PartitionKey”:
“RecId”
“RowKey”:
122121212121,
“Acqmethod”:
“Test1”,
“Description”:
“Test1 desc”
}
b.
You can optionally choose a ‘compose’ action
from above result.
c.
Add an action as ‘Insert entity’ by choosing
from ‘Table storage’ connecter.
d.
Choose from step-b, choose from the Table that
you have created (evidently it relates the set of tables available from the
same azure subscription.
e.
Add a ‘Get entity’ action à it acts like an query,
select the table you created and ‘PartitionKey’ and ‘RowKey’ values from the
payload defined on Step-a.
So as a result the code for the logic app looks like:
{
"definition": {
"$schema":
"https://schema.management.azure.com/providers/Microsoft.Logic/schemas/2016-06-01/workflowdefinition.json#",
"actions": {
"Compose": {
"inputs":
"@triggerOutputs()['queries']",
"runAfter": {},
"type": "Compose"
},
"Get_entity": {
"inputs": {
"host": {
"connection": {
"name":
"@parameters('$connections')['azuretables']['connectionId']"
}
},
"method": "get",
"path":
"/Tables/@{encodeURIComponent('_Table_Name_')}/entities(PartitionKey='@{encodeURIComponent(triggerBody()?['PartitionKey'])}',RowKey='@{encodeURIComponent(triggerBody()?['RowKey'])}')"
},
"runAfter": {
"Insert_Entity": [
"Succeeded"
]
},
"type": "ApiConnection"
},
"Insert_Entity": {
"inputs": {
"body":
"@outputs('Compose')",
"host": {
"connection": {
"name":
"@parameters('$connections')['azuretables']['connectionId']"
}
},
"method": "post",
"path":
"/Tables/@{encodeURIComponent('_Table_Name_')}/entities"
},
"runAfter": {
"Compose": [
"Succeeded"
]
},
"type": "ApiConnection"
},
"Post_a_message_(V3)": {
"inputs": {
"body": {
"body": {
"content":
"<p>@{outputs('Compose')}</p>",
"contentType": "html"
}
},
"host": {
"connection": {
"name":
"@parameters('$connections')['teams']['connectionId']"
}
},
"method": "post",
"path":
"/v3/beta/teams/@{encodeURIComponent('*****')}/channels/@{encodeURIComponent('***@thread.skype')}/messages"
},
"runAfter": {
"Get_entity": [
"Succeeded"
]
},
"type": "ApiConnection"
}
},
"contentVersion":
"1.0.0.0",
"outputs": {},
"parameters": {
"$connections": {
"defaultValue": {},
"type": "Object"
}
},
"triggers": {
"manual": {
"inputs": {
"schema": {
"properties": {
"AcqMethod": {
"type": "string"
},
"Description": {
"type": "string"
},
"PartitionKey": {
"type": "string"
},
"RowKey": {
"type": "string"
}
},
"type": "object"
}
},
"kind": "Http",
"type": "Request"
}
}
},
"parameters": {
"$connections": {
"value": {
"azuretables": {
"connectionId":
"/subscriptions/****/resourceGroups/****/providers/Microsoft.Web/connections/azuretables",
"connectionName":
"azuretables",
"id": "/subscriptions/*****/providers/Microsoft.Web/locations/westus/managedApis/azuretables"
},
"teams": {
"connectionId":
"/subscriptions/****/resourceGroups/****/providers/Microsoft.Web/connections/teams-1",
"connectionName":
"teams-1",
"id": "/subscriptions/****/providers/Microsoft.Web/locations/westus/managedApis/teams"
}
}
}
}
}
The logic app gives the following outcome, when fired from
Postman:


Comments
Post a Comment