Implement no code predicitve modelling with Azure ML studio: step by step


Wassup guys?!!

Today we are gonna talk about a very interesting and cool feature of Azure ML studio, that can help you to consume bulk data, to predict complex outcomes, with/without writing any code. Don't believe it? Yeah, this could be done by setting up your Azure ML pipelines, and then implementing proper components to it, that can fiddle with the data, with cleansing, selecting necessary algorthims and training and evaluating the model with outcome scores (that indicates the correctness of your model structure). This article is a step by step process that can guide you to implement the same.

But before I begin, let me refresh you with some basic concepts:

What is a Decision Tree algorthim in Machine Learning?

A decision tree is a supervised learning algorithm that is used for classification and regression modeling. Regression is a method used for predictive modeling, so these trees are used to either classify data or predict what will come next.

Below is an example to evaluate how someone is prone to having a hear attack:


Decision nodes are the ones from where further branching/decision needs to be done and is indicated by circle or a square.
Leaf nodes are the ones where the final decision is achieved and needs no further decision/branching.
If the tree goes unnecessarily large and out of control, then we need to cut the trees preventing further growth – this is known as Pruning.

What is Random Forest Algorithm?
Random Forest is a widely-used machine learning algorithm developed by Leo Breiman and Adele Cutler, which combines the output of multiple decision trees to reach a single result. Its ease of use and flexibility have fueled its adoption, as it handles both classification and regression problems. Random forests is an ensemble learning method (meaning not one, but many is involved to derive a conclusion). It’s an extension of decision trees; they are used to correct the decision trees’ habit of overfitting their training set. In contrast to one decision tree, we create multiple decision trees with the data and then create take the outcome as a combination of individual results.

What is a 'Two class boosted decision tree' algorithm?
A boosted decision tree is an ensemble learning method in which the second tree corrects for the errors of the first tree, the third tree corrects for the errors of the first and second trees, and so forth. Predictions are based on the entire ensemble of trees together that makes the prediction.

What is Azure ML pipeline?
Azure Pipelines enables developers to automate a wide variety of tasks, ranging from executing a batch file to setting up a complete continuous integration (CI) and continuous delivery (CD) solution for their applications, along with that you can also stackn up large data to understand, interpret and predict/classify/extrapolate an outcome. In our case, we are gonna use the Azure ML pipeline to process a large data and to predict the outcome from the same, through a number of stages. 

What is a Azure ML compute:
Once you have create a Azure ML resource workspace, you need to create a compute: which could be either a VM instance or a cluster instance or a serverless instances, which you can make your data job executed against. For your demo/RnD puroposes you can go for a normal VM instance, as these are much cheaper and easy to maintain than a cluster instance. 

What happens during a model training?
A data training program has several steps: 
>> Data input: Here we are staging up our designer pipeline with the large data set, either from a file or from an data URL or from Azure SQL or Azure container. This is called as 'Data Asset'.
>> Data cleansing: We can process null values, mising values, repititive values -- and anything else we want to preprocess our data with. 
>>  Choosing the right algorithm: here you have to understand how should your model behave: is it classification or a regression algo and accordingly you can choose from a host of relevant algos available.
>> Once we choose the necessary model to train our program with the given data, we have to split up the data into two sects: one for training another for testing
>> Score the data and evaluate the prediction.

The whole process is iterative, where you may need to adjust between different algos, choose between different split percentages of train-test data: ex 70-30, 80-20, 50-50: until you get more and more precise answers.

With so much of lecture, let us get our hands dirty on applying all these practically:

Step 1: create a Azure ML resource:
Go to https://portal.Azure.com and create a new resource >> select Azure Machine Learning >> Choose Create a new Workspace:


And fill up the following form that comes:

Select your suitable resource group, give a proper name and a region. All else, you can leave as it is, as they come pre-populated. 
Click Review + Create >> Create to complete the wizard.
It will take a while to create the workspace. The following resource will be created:

Click on Launch Studio to continue.

Step-2: Create a compute:
My Azure ML studio welcomes me with a gallery of options, possibilities, components and templates to work with:

  
We can explore each of the leeft hand side pane topics like: creating Data assets, Jobs, Automated MLs, Notebooks -- each is a fresh topic of discussion and I would cover them all on my subsequent posts.
For now, let us begin with creating a Compute, namely a Compute Instance. In the Compute Instance Tab >> Click on New to proceed:

Give a proper name to the instance. Select Virtual machine type as 'CPU':

Although you should need to choose between the option, depending on a lot of parameters. The CPU handles all the tasks required for all software on the server to run correctly. A GPU, on the other hand, supports the CPU to perform concurrent calculations. A GPU can complete simple and repetitive tasks much faster because it can break the task down into smaller components and finish them in parallel.
Select Virtual machine size by choosing from 'Select from all options' >> And from there choose the following one which has a very low rate of cost:


Coming to Scheduling >> you can choose when should you want your compute to get shut down:

Addtionally you can go to Applications Tab >> provide Application script. In the environment tab >> Add an environment.
Else you are now good to Review + Create >> Create. With that you would just provision your instance to get created/spin up.

Step 3: create a data asset
Next is for our demo purpose, we can create a Data asset. We have a large data containing the state and year wize Indian Population, from the following URL:
https://raw.githubusercontent.com/nishusharma1608/India-Census-2011-Analysis/master/india-districts-census-2011.csv
Which has a State and district wise census figure.
Create a new Data asset >> fill out the form like this:

Click on Next. Select Source as 'Web files':


Click on Next. Put the URL in the highlighted text:

This will validate the data within few moments and will come to the next screen:


The above is a post mortem of the data you have uploaded, with every metadata and necessary column datatype details.  

And in the next screen, you could get the scehma details:

Click Next and create the Data asset. It will create the data asset like this:


Step 4: Create a new pipeline:

Go to designer >> create a new pipleline: and come to the Data tab, to select the dataset which you just created:


Click on Component tab >> search: Clear missing data >> drag and drop it in the pane. Connect the end Data Output node to Dataset node.


In the above screen shot, I have selected another intermediate step called 'Execute Python script', so as to get rid of null values. But As promised, I won't include any code in this blog, hence I am avoiding that 😅 Double click on the node and you can select all the columns you need to clean up, replace with any value:


And you can give here whichever column you want to manipulate the data with. 

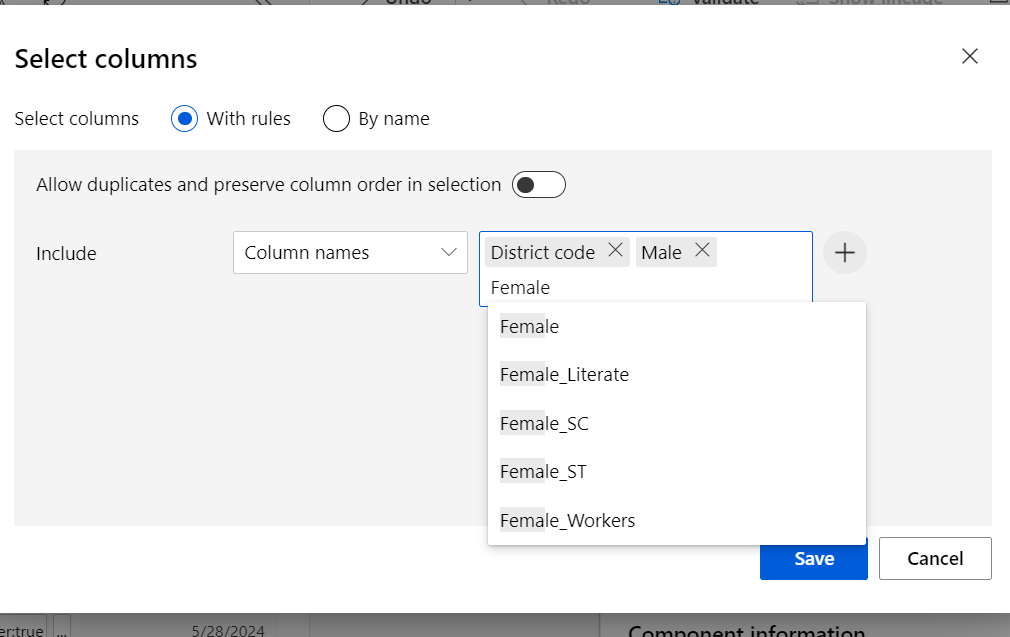
Next, search 'select columns in dataset':


Double click on the node >> select all the fields which youn need by typeing the names:


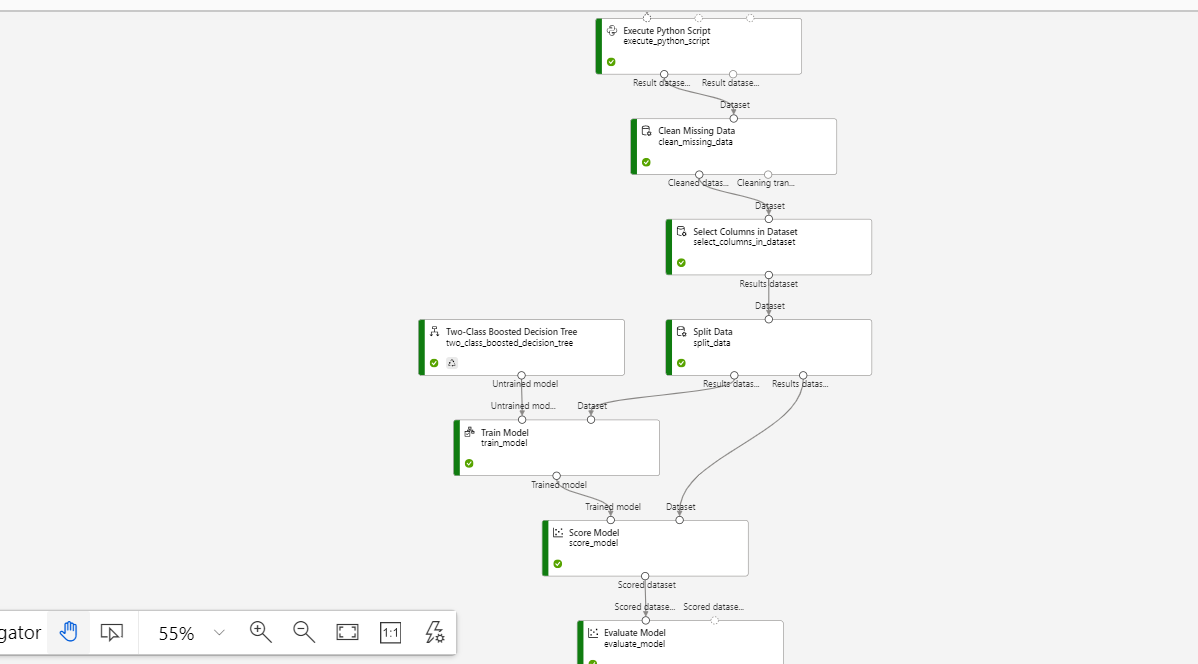
 Select 'Two class boosted decision tree', train model, split data, score model and evaluate model. Join them like this one:


 Just see how the nodes are connected. Double click on Split data>> select 0.7 as fraction of the data to be trained. In the Train model >> give the label column as 'Population' (implying this is what our model will predict):

Also see, how you are making the model be trained based on the 2-class boosted decision tree algo, and how the score is getting evaluated to the evaluation node.

Done!!!

Click on the 'Auto save' toggle, to make your design be saved, as you keep creating. 

Click on 'Configure and submit' >> select create a new experiment: and fill out the following details:


In the runtime settings, select the compute instance which you created:


Click Review + submit >> it will initalize the job in a while. 

And whew!!! You can go to jobs >> select the job which you created and can see how it's performing, error if any and the outcome:


Post this, if you are not happy with outcome, you can fine tune the result by changing the model or by changing the training data and a lot of other config activities.  You can also add to compare to compare between different runs of the program.

Concluding the discussion, here -- would come back with more such awesome features of Azure ML, soon, on another blog. Much love and Namaste💓💓💓

Comments

Popular posts from this blog

X++ : mistakes which developers commit the most

Make your menu items visible on main menu, conditionally,, using this cool feature of D365FO

Speed up your execution performance by using SysGlobalCaches