Predict lung cancer malignancy, using Azure AI ML studio, using Deep learning (low code-no code)

https://subsd365.blogspot.com/2024/08/implement-no-code-predicitve-modelling.html
https://subsd365.blogspot.com/2024/09/step-by-step-azure-ml-job-to-predict.html
This post would give you an impression as to how leverage large datasets to evaluate a complex possibility (any patient having chances of relapses of a disease like Cancer/ its malignancy), by doing Classification based algorithm, without practically writing a single line of code.
Here goes the steps:
Step 1: Creating a data-ML job --
Once you have created An Azure ML Studio Workspace, you can crawl down to Automated ML Jobs section as shown below:


Fill it out, as shown. In the experiment, I have selected New experiment; Alternately, you can select an existing one.

Click on Create to proceed:

Fill out the screen as follows; do select Type as Tabular:

Select Source as web files in the next screen:

This will take you to the following screen:


And in the next step, click on Create to create the data step:

Once the data gets created, you would come back to the screen, from where you started it all:

And in the following screen, we are selecting the column we need for prediction:


I have exluded them purposely, as they are not really related to classification algorithms. excluding them, would just save some cost.
Click on Save.
Click on Validation Type as: K-Cross validation, and test data as 30% of data, as a result 70% of the data would be kept for training and 30% as testing:


Once done, now you can put it for training job:

Here you need to wait, till the time the algo completes the training, by going through the model again and again (called as Epochs).
Step 2: Create and endpoint
Once the training is complete, it looks like:

Click on Model+Child Jobs, to see the list of associated jobs created along with.

Select the one with AUC weight that is close to 1 >> Click Deploy to continue:

Choose Real time time endpoint. The following scteen will appear:
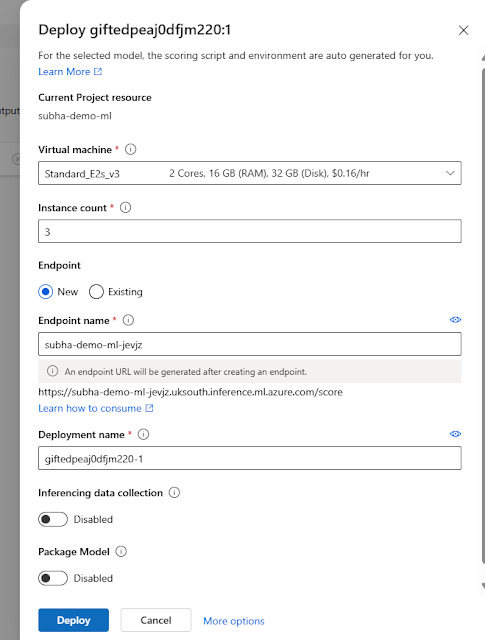
Choose the necessary Virtual machine and click on Deploy button to continue. This will initialise the deployment and will consequently turn you back to the following screen:


It will be shown as Creating state:

Once done, teh deployment looks like this:

Uh, now it's ready -- let us test it.
Step 3: testing the endpoint --
Click on Test tab:

I tested with the following JSON:
{
"input_data": {
"columns": [
"GENDER",
"AGE",
"SMOKING",
"YELLOW_FINGERS",
"ANXIETY",
"PEER_PRESSURE",
"CHRONIC DISEASE",
"FATIGUE",
"ALLERGY",
"WHEEZING",
"ALCOHOL CONSUMING",
"COUGHING",
"SHORTNESS OF BREATH",
"SWALLOWING DIFFICULTY",
"CHEST PAIN"
],
"index": [1],
"data": ["M",69,1,2,2,1,1,2,1,2,2,2,2,2,2]
}
}
And the answer came: YES
You can automate the testing by calling from a web service/API/Azure function directly -- like the example given in my previous post.


Comments
Post a Comment